This is a full step-by-step tutorial on how to create, build and deploy locally a Holochain 0.0.119 app.
This tutorial does not explain how to use Holochain to build a meaningful app : it is rather a guide to help you set up a working local environment with an empty project, so that you can easily start your Holochain development journey.
You will find detailed instructions to create a minimal working project from scratch, with only the mandatory dependencies, and then run it locally.
The full code for this tutorial is available here : https://github.com/wimpheling/holochain-getting-started-example
Technical environment
We will create a happ called my-holochain-app, that has the very useful purpose of adding 10 to a number provided by the user as input. It will consist of two main parts, backend and frontend :
The backend of the app is the proper P2P holochain application. It is the piece of software that will manage a shared DHT between all running nodes. Like traditional backends, it will be in charge of data integrity, authorization/authentication etc.
It will be built upon the holochain development kit (HDK). For now, the HDK is only available for the Rust language.
Don’t worry about configuring rust though, it will all be handled by the nix installation (see below).
The frontend, or UI part of the hApp, is a standard typescript browser app.
You can use any JS framework to build your app, but for the purpose of this simple tutorial, we will only make a very simple vanilla Typescript project, in order to focus on Holochain itself rather than a JS library that the reader may not be familiar with.
The following versions of the holochain libraries are used (this article will be updated frequently to use the latest releases):
- hdk 0.0.116
- holochain_cli 0.0.20
Existing resources
Here are the existing educational resources provided by the Holochain team that I used to get started :
Part of this blog post was copied from the Happ Build tutorial.
Installing nix
Before coding, we must ensure we work in a proper environment.
Holochain provides a nixOS setting for you to use. Nix allows you to reproduce a linux environment with all packages (rust, npm, holochain cli …) marked as an exact, specific version, in order to guarantee full reproducibility of the build/dev/run environment.
Holochain also provides a cross-platform guide to help you install and configure nix-shell on your environment at this URL :
Once this is done, you should be able to run
nix-shell https://holochain.love
Once in nix-shell, run
hc --version
and you should see
holochain_cli 0.0.20
If your version is more recent, this means this blog post is outdated and may not be valid anymore. Sorry about that !
We will continue this tutorial logged in the nix-shell environment with the command above.
Creating the parent project
Our project will be named my-holochain-app.
As said before, our app will consist of a backend and a frontend. Let’s first create a parent folder to host both, and initialize it as a git repository.
mkdir my-holochain-app
cd my-holochain-app
git init
The Holochain app
We will now handle the “backend” of the app, aka the Holochain project.
Create the workspace
Initialization of the workspace
This is a rust project, so we’ll just use Cargo, rust’s official package manager, to scaffold the project.
# You should be in the directory /my-holochain-app
cargo new hc-app
cd hc-app
Configuration of the rust workspace
One particularity is that the main rust project we just created, will have no code, and is just a placeholder for zome crates. We need to reflect that in our code by :
- removing the scaffolded code
# You should be in the directory /my-holochain-app/hc-app
rm -rf ./src
- removing the package declaration from
Cargo.toml. That means that you must keep the file, but you can delete all its content, and leave a blank file.
Cargo.tomlwill receive some more content later, but don’t forget to remove the[package]section or the build will fail.
hApp logical structure
Before we go further, let’s examine the structure of a hApp. Holochain have created their own vocabulary, based on a biological analogy, to explain how their code is organised.
- A Zome, short for chromosome, is the smallest unit of code in a holochain app. Technically, a Zome is a Rust crate that exposes a number of functions.
- A DNA is a higher-order collection of zomes. It is described in a yaml file.
- A hApp (short for holochain app) aggregates different DNAs into a unique app.
We will first create a zome, then its DNA and hApp containers.
Create a zome
Initialization of a zome
Let’s create a new zome, called numbers. As explained before, zomes are rust crates so we’ll just create one using Cargo.
# you should be in the directory my-holochain-app/hc-app
cargo new zomes/numbers --lib
As it is a sub-crate of a wider rust workspace, we must now declare the zome as part of this workspace in the main Cargo file (the one we emptied earlier).
# my-holochain-app/hc-app/Cargo.toml
[workspace]
members = [
  "zomes/numbers",
]
Crate configuration
We need to configure the crate properly, and also to include the only two dependencies we will need:
hdkis the Holochain Development Kit crate, provided by Holochain and is needed to interact with the app.serdeis the rust crate to manage serialization/deserialization and is needed to let us export our ownstructsthrough the HDK.
Let’s edit the numbers zome Cargo.toml file to look like that:
# my-holochain-app/hc-app/zomes/numbers/Cargo.toml
[package]
name = "numbers"
version = "0.1.0"
edition = "2018"

[lib]
name = "numbers"
crate-type = [ "cdylib", "rlib" ]

[dependencies]
hdk = "0.0.116"
serde = "1"
Write the actual code
Without going into too much detail, we will create here a simple “add ten” rust function as well as its input and output structs, and expose the function in the holochain App by using the #[hdx_extern] annotation.
Let’s just paste that code in lib.rs
// my-holochain-app/hc-app/zomes/numbers/src/lib.rs
use hdk::prelude::*;

#[derive(Serialize, Deserialize, SerializedBytes, Debug, Clone)]
pub struct ZomeInput {
    pub original_number: i32,
}

// data we want back from holochain
#[derive(Serialize, Deserialize, SerializedBytes, Debug, Clone)]
pub struct ZomeOutput {
    pub other_number: i32,
}

#[hdk_extern]
pub fn add_ten(input: ZomeInput) -> ExternResult<ZomeOutput> {
    Ok(ZomeOutput {
      other_number: input.number + 10
    })
}
We now have a valid zome that exposes a rust function. Let’s compile it.
Compile the zome into WebAssembly (WASM)
Don’t forget that you should be using nix-shell (see above) when running rust
When you want to build your zomes into WebAssembly (wasm), simply run
# run from my-holochain-app/hc-app
CARGO_TARGET_DIR=target cargo build --release --target wasm32-unknown-unknown
and they will be available in target/wasm32-unknown-unknown/release/.
You will have to rerun this any time you edit your Zomes.
Package the zome into a DNA file
Create and configure the DNA
Remember that zomes are part of DNAs ? It is now time to create the math DNA, that will contain the numbers zome.
Contrary to zomes, DNAs are not rust crates. They are a HDK-level abstraction, so we will use the holochain CLI hc, that is bundled with the nix environment, to scaffold our DNA.
# you should be in the directory my-holochain-app/hc-app
hc dna init dnas/math
hc will now prompt us for some configuration settings, seen below. We can use the default uid for our test purposes and press enter at that prompt.
name: math
uid: (00000000-0000-0000-0000-000000000000)
hc will create a file named my-holochain-app/hc-app/dnas/math/dna.yaml, which should look like that
# my-holochain-app/hc-app/dnas/math/dna.yaml
---
manifest_version: "1"
name: math
uid: 00000000-0000-0000-0000-000000000000
properties: ~
zomes: []
We will just change the last zomes property to declare our numbers zome:
# my-holochain-app/hc-app/dnas/math/dna.yaml
zomes:
  - name: numbers
    bundled: ../../target/wasm32-unknown-unknown/release/numbers.wasm
Build the DNA
We can now build our DNA.
# you should be in the directory my-holochain-app/hc-app
hc dna pack dnas/math
This should produce the file my-holochain-app/hc-app/dnas/math/math.dna
You will have to rerun this step (hc dna pack) any time you change and rebuild your Wasms.
Package your DNAs into a happ file
The hApp is the final container of DNAs. We also need to configure that level, in a new my-happ folder, before we package it.
hApp configuration
# you should be in the directory my-holochain-app/hc-app
hc app init my-happ
hc will prompt us like it did when we created the DNA :
name: my-happ
description:
This will create a my-holochain-app/hc-app/my-happ/happ.yaml file. We will need to edit the bundled property to give the right path to our newly bundled DNA file. The modified file should look like this :
# my-holochain-app/hc-app/my-happ/happ.yaml
---
manifest_version: "1"
name: my-happ
description: ~
roles:
  - id: math-role
    provisioning:
      strategy: create
      deferred: false
    dna:
      bundled: "../dnas/math/math.dna"
      properties: ~
      uid: ~
      version: ~
      clone_limit: 0
Bundle your happ
# you should be in the directory my-holochain-app/hc-app
hc app pack my-happ
This will package the happ as my-holochain-app/hc-app/my-happ/my-happ.happ
Again, you will have to rerun this step (hc app pack) when you rebuild your Dna.
So yes, that means, when you modify a zome, you have to:
- compile the zome using
cargo - pack the DNA using
hc dna pack - package the hApp using
hc app pack
But remember, Holochain is still in alpha so surely with time dev tools will provide ways of automating that seamlessly.
Running the hApp locally
We’re almost there ! From nix-shell we can now run our hApp locally, on the 8888 port using
hc sandbox generate my-happ --run=8888 -a "my-happ"
We also use the -a option to specify the name under which the happ should be deployed (the name you specify in the happ.yaml file is not taken into account).
You can read more documentation about the hc sandbox here: https://github.com/holochain/holochain/tree/develop/crates/hc_sandbox
You should then have this kind of output (I shortened):
hc-sandbox: Creating 1 conductor sandboxes with same settings
[...]
hc-sandbox: Running conductor on admin port 43871
hc-sandbox: Attaching app port 8888
hc-sandbox: App port attached at 8888
hc-sandbox: Connected successfully to a running holochain
Congratulations ! Your hApp is now running. Let’s now build a Client App so we can use it.
Before we move on to that, please notice I have skipped writing tests, so for now we can’t really tell if our app works. The tests will maybe be handled in another post.
Cheatsheet : recompiling and relaunching the app
As you can see, the tooling is still rudimentary, so when you edit your zomes here is a quick sequence of the commands you need to run:
# if you're not in nix-shell run : nix-shell https://holochain.love
# you should be in the directory my-holochain-app/hc-app
CARGO_TARGET_DIR=target cargo build --release --target wasm32-unknown-unknown
hc dna pack dnas/math
hc app pack my-happ
hc sandbox generate my-happ --run=8888 -a "my-happ"
The Frontend/client (typescript) app
Environment
I assume that you have a working node environment with node 16 and npm 8. If you don’t, I advise you to use nvm to manage your nodeJS env.
Initialization of the frontend
Let’s go back to the root of our git repo, and create a sibling project to the hc-app one. We’ll call the project hc-ui, and create it with vite using the vanilla typescript template.
# you should be in the directory my-holochain-app
npm init vite@latest hc-ui -- --template vanilla-ts
cd hc-ui
Testing the server
You can verify the installation worked
# you should be in the directory my-holochain-app/hc-ui
# install the npm dependencies
npm i
# and run the server
npm run dev
You should now see the Vite default page at http://localhost:3000
You can stop the server by pressing Ctrl+C
Adding the holochain conductor dependency
We will just need to add this npm module to be able to connect to our app instance.
# you should be in the directory my-holochain-app/hc-ui
npm i @holochain/conductor-api
Creating the zome access code
We will now create the code to communicate with holochain. You can create a new file named my-holochain-app/hc-ui/src/addTen.ts.
Unfortunately, Holochain currently provides no automatic bindings to typescript so we will need to write them ourselves.
First, let’s define the input and output typescript types, so that they match the ones we defined in the Rust code.
// my-holochain-app/hc-ui/src/addTen.ts

interface ZomeInput {
  original_number: number;
}

interface ZomeOutput {
  other_number: number;
}
As the typescript holochain library is very minimalistic, we will create our own client class, tailored to match our API, to be called from our TS app. We will export a function that works as a kind of factory: it will instantiate a Holochain client to discuss with our Holochain Rust backend, and return functions to call specific API endpoints of the backend. As an Holochain app is exposed as a Websocket server, we will also export a function that will close the connection when or if needed.
WARNING : when testing the client, for now it seems the close function throws an error… TBD (to be debugged)
First, we will need to add some imports from the @holochain/conductor-api module to the top of our file, as well as define some constants to define the different IDs we need to make our zome call correctly.
// my-holochain-app/hc-ui/src/addTen.ts
import { AppWebsocket, CallZomeRequest } from '@holochain/conductor-api';

const WS_URL = 'ws://localhost:8888';
// The name of the happ. For some reason it seems to always be "test-app" whatever name you choose in your hApp config ?
const H_APP_ID = 'my-happ';
// The name of the zome
const ZOME_NAME = 'numbers';
// The name of the function
const FN_NAME = 'add_ten';
We can then define the types, and write our initMyHappClient factory function.
Here is how are proceeding (I have to remind you here, that I am a HC beginner, so my explanations about calling the zomes might be imprecise or even incorrect !).
- We first have to open a connection to the Websocket server at
localhost:8888, using theAppWebSocketprovided by the HC module. - With this connection, we then call
appInfo, to make sure our app does exist. We provide theinstalled_app_idparameter, and it should match the hApp name we had filled in thehapp.yamlfile of the Rust HC app. In our case, the value ismy-happ. appInfowill returncell_datainfo. In my understanding, this allows us to get a less genericcell_id, which is a system ID for the current instantiation of the selected hApp on the node we are talking with. Thiscell_idis the one we will use to make actual zome/function calls.- Making a zome/function call is what we do in the
addTenmethod of our TS client. We will provide thecell_id, the zome name (here: numbers), the function name (here: add_ten), as well as the payload (here : theZomeInputobject). Note: There is also aprovenancefield. In this example, it is derived from the cell_id, because this demo happ doesn’t handle multiple users, so every message will be signed by the node’s agent key. Hopefully in a next tutorial we will tackle the subject of user authentication in a hApp.
// my-holochain-app/hc-ui/src/addTen.ts
// This is the typing of our client API
export type HolochainConductor = {
    addTen: (baseNumber: number) => Promise<ZomeOutput>,
    close: () => void
}

export const initMyHappClient = async (): Promise<HolochainConductor> => {
  // 1. open a connection to the WebSocket server
  const appClient = await AppWebsocket.connect(WS_URL)
  // 2. Getting appInfo from the hApp name
  const appInfo = await appClient.appInfo({ installed_app_id: H_APP_ID });
  // 3. Check cell data
  if (!appInfo?.cell_data[0]) {
    throw new Error('No app info found');
  }

  return {
    addTen: async (originalNumber: number) => {
      const cell_id = appInfo?.cell_data[0].cell_id;
      const payload: ZomeInput = { original_number: originalNumber };
      // define the context of the request
      const apiRequest: CallZomeRequest =
      {
        cap: null,
        cell_id,
        zome_name: ZOME_NAME,
        fn_name: FN_NAME,
        provenance: cell_id[1], // AgentPubKey,
        payload
      };

      // 4. Actual zome code
      try {
        // make the request
        const numbersOutput: ZomeOutput = await appClient.callZome(apiRequest);
        // the result is already deserialized
        return numbersOutput
      } catch (error) {
        console.log('Got an error:', error);
        throw error;
      }
    },
    close: () => {
      appClient.client.close();
    }
  }
}
Using the client API
We have now created a client for our Rust hApp, let’s create a very simple typescript app that actually calls it and lets us add 10 to a number of our choice.
As said earlier, we will use no framework here because this is just a very simple demo app, and we want to focus on the holochain related code rather than boilerplate framework-specific code !
So let’s create the code. I will not comment it in detail as it is pretty standard. We’re basically initializing the HC client, let the user enter a number and add 10 to it, and then we display the result.
This code will replace the existing main.ts created by the Vite template.
// my-holochain-app/hc-ui/src/main.ts
import { HolochainConductor, initMyHappClient } from './addTen'
import './style.css'

const initApp = async (): Promise<void> => {
  const app = document.querySelector<HTMLDivElement>('#app')!
  app.innerHTML = `<h1>My-happ test</h1>
  Your number: <input id="number-input" type="number" />
  <br />
  <button id="add10">Add 10</button>
  <br />
  <div id="result"></div>
  `

  let client: HolochainConductor
  const resultPlaceholder = document.querySelector<HTMLInputElement>('#result')!;

  try {
    client = await initMyHappClient();
  } catch (e) {
    resultPlaceholder.innerText = "Error initializing the client"
  }

  const addTenHandler = async () => {
    resultPlaceholder.innerText = ''
    const numberInput = document.querySelector<HTMLInputElement>('#number-input')!;
    const originalNumber = parseInt(numberInput.value)
    if (isNaN(originalNumber)) {
      resultPlaceholder.innerText = "Invalid number"
      return
    }
    try {
      const result = await client.addTen(originalNumber)
      resultPlaceholder.innerText = `Result: ${result.other_number}`
    } catch (e) {
      resultPlaceholder.innerText = `There was an error while calling the zome`
    }
  }
  const addTenButton = document.querySelector<HTMLInputElement>('#add10')!

  addTenButton.onclick = addTenHandler
}

initApp()
launching the UI app
We said it earlier, but here is a quick reminder of the command that launches in the UI in case you stopped it:
npm run dev
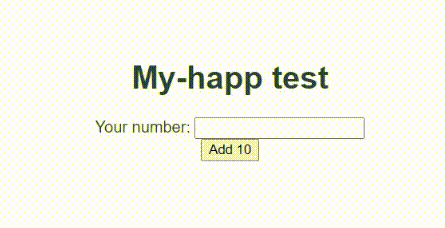
Verifying the app works
You should now
- have your holochain rust app running on
ws://localhost:8888 - have your client app running on
http://localhost:3000
And here is what is should look like :
Conclusion
I hope you found this tutorial useful. I actually wrote it because, although some resources are available on the web, I recently started coding with Holochain and felt such a blog post was missing.
I plan to continue to document here my progress in using the Holochain framework. The next topics should be :
- Using the DHT (read/write)
- Bundling and running your hApp in the Holochain Launcher
- Configuring user access
- Deploying on Holo.host (when it is available of course !)
And to conclude and open the discussion, here are some defects I found during the course, it’s mostly missing tooling that I’m sure the team or the community will easily provide if the project gets some traction.
- You need to rebuild zomes, then DNA, then happ for every change
- it’s not possible to automatically get typescript signatures for the exported zomes/hApp functions. Rust crates such as
wasm-bindgendo provide that feature for the functions they export so maybe some existing code can be leveraged ?